liuyujie0136's Website

A website for self learning, collecting and sharing.
LaTeX使用技巧
LaTeX将长表格Table横置(旋转90度)
https://blog.csdn.net/haifeng_gu/article/details/108563975
在写论文时,长表格会超出页面的右边界,因此需要将长表格旋转90度横放在页面中。
解决办法
首先在导言区添加rotating宏包:\usepackage[figuresright]{rotating} ,然后,将
\begin{table}[thp]
	\caption{This is the caption}
	\centering
	\begin{tabular}{|c|c|c|c|}
		\hline
        .......
    \end{tabular}
\end{table}
中的table环境改为sidewaystable环境:
\begin{sidewaystable}[thp]
	\caption{This is the caption}
	\centering
	\begin{tabular}{|c|c|c|c|}
		\hline
		.......
	\end{tabular}
\end{sidewaystable}
\usepackage[figuresright]{rotating}:图注在右,表头在左;使用left则相反
参考
LaTeX并排插入图片以及去掉图片编号
https://blog.csdn.net/programchangesworld/article/details/51553683
使用LaTex并排插入图片的时候,会给每一个图片编号,有时我们并不需要自动编号,所以这次就是去掉图片的编号。这里使用的是caption和subcaption宏包里的 \caption*{}和 \subcaption*{}命令,这两条命令可以使图片不用计数显示标号。
%Tex program = xelatex
%software = TexLive 2015
%本程序的作用是解决LaTex插图的问题,一是并排插入图片,二是解决图片的标号问题
%引用自(http://tieba.baidu.com/p/4582793482)
\documentclass[a4paper,UTF8]{article}
\usepackage{ctex}
\usepackage{graphicx}
\usepackage{caption,subcaption}
\begin{document}
\begin{figure}[ht]
\centering
\begin{subfigure}[t]{0.3\textwidth}
\centering
\includegraphics[width=1\textwidth]{a1.jpg}
\subcaption*{伤心图}
\end{subfigure}
\quad
\begin{subfigure}[t]{0.3\textwidth}
\centering
\includegraphics[width=1\textwidth]{a2.jpg}
\subcaption*{开心图}
\end{subfigure}
\quad
\begin{subfigure}[t]{0.3\textwidth}
\centering
\includegraphics[width=1\textwidth]{a3.jpg}
\subcaption*{帅哥图}
\end{subfigure}
\caption*{都是表情图}
\end{figure}
\end{document}
LaTeX排版札记:插入图片(并排显示、自定义编号)
https://zhuanlan.zhihu.com/p/32925549
1.单图插入的基本用法
%导言区插入下面三行
\usepackage{graphicx} %插入图片的宏包
\usepackage{float} %设置图片浮动位置的宏包
\usepackage{subfigure} %插入多图时用子图显示的宏包

\begin{document}

\begin{figure}[H] %H为当前位置,!htb为忽略美学标准,htbp为浮动图形
\centering %图片居中
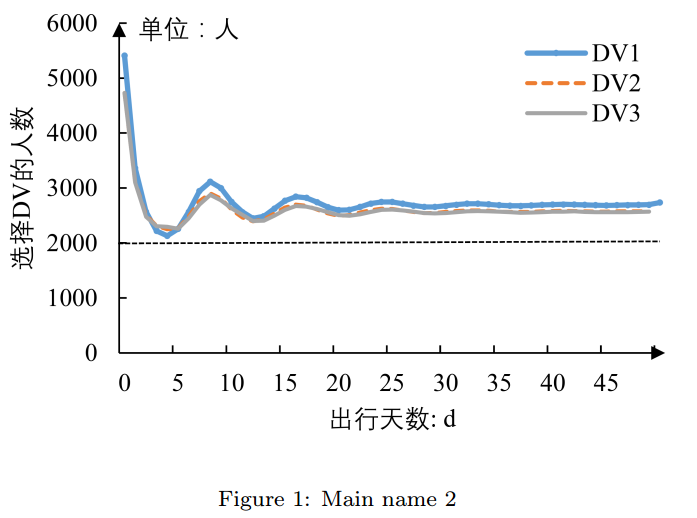
\includegraphics[width=0.7\textwidth]{DV_demand} %插入图片,[]中设置图片大小,{}中是图片文件名
\caption{Main name 2} %最终文档中希望显示的图片标题
\label{Fig.main2} %用于文内引用的标签
\end{figure}

\end{document}
编译之后,得到:
2.多图横排+默认编号
%导言区插入下面三行
\usepackage{graphicx}
\usepackage{float}
\usepackage{subfigure}

\begin{document}
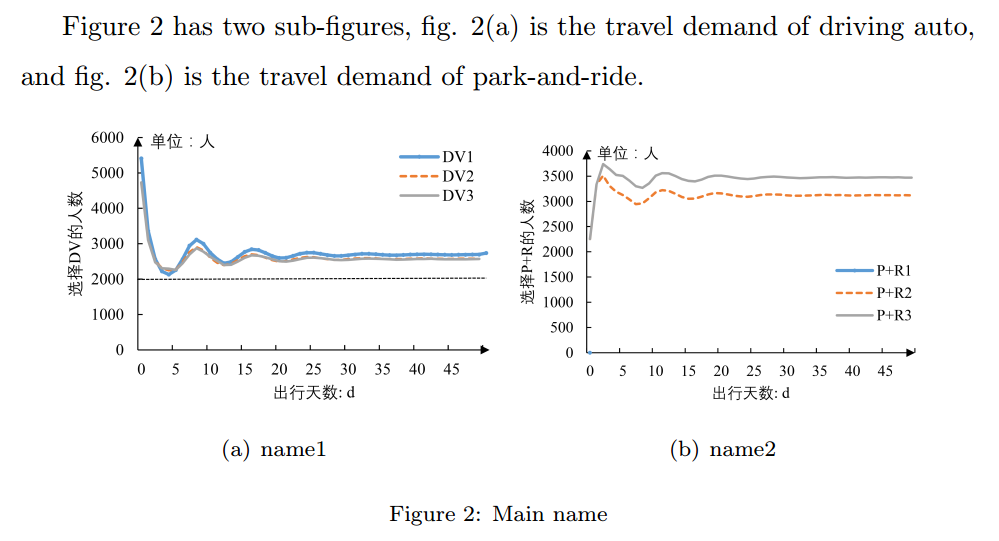
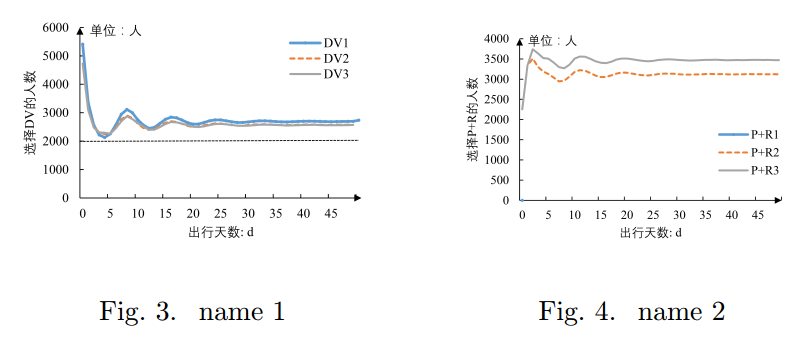
Figure \ref{Fig.main} has two sub figures, fig. \ref{Fig.sub.1} is the travel demand of driving auto, and fig. \ref{Fig.sub.2} is the travel demand of park-and-ride.

\begin{figure}[H]
\centering  %图片全局居中
\subfigure[name1]{
\label{Fig.sub.1}
\includegraphics[width=0.45\textwidth]{DV_demand}}
\subfigure[name2]{
\label{Fig.sub.2}
\includegraphics[width=0.45\textwidth]{P+R_demand}}
\caption{Main name}
\label{Fig.main}
\end{figure}
\end{document}
编译完成后的效果:
3.多图横排+自定义编号
%导言区的此三行无变化
\usepackage{graphicx}
\usepackage{float}
\usepackage{subfigure}
%以下是新增的自定义格式更改
\usepackage[]{caption2} %新增调用的宏包
\renewcommand{\figurename}{Fig.} %重定义编号前缀词
\renewcommand{\captionlabeldelim}{.~} %重定义分隔符
 %\roman是罗马数字编号,\alph是默认的字母编号,\arabic是阿拉伯数字编号,可按需替换下一行的相应位置
\renewcommand{\thesubfigure}{(\roman{subfigure})}%此外,还可设置图编号显示格式,加括号或者不加括号
\makeatletter \renewcommand{\@thesubfigure}{\thesubfigure \space}%子图编号与名称的间隔设置
\renewcommand{\p@subfigure}{} \makeatother

\begin{document}
%注意:此段中在引用中增加了主图编号的引用
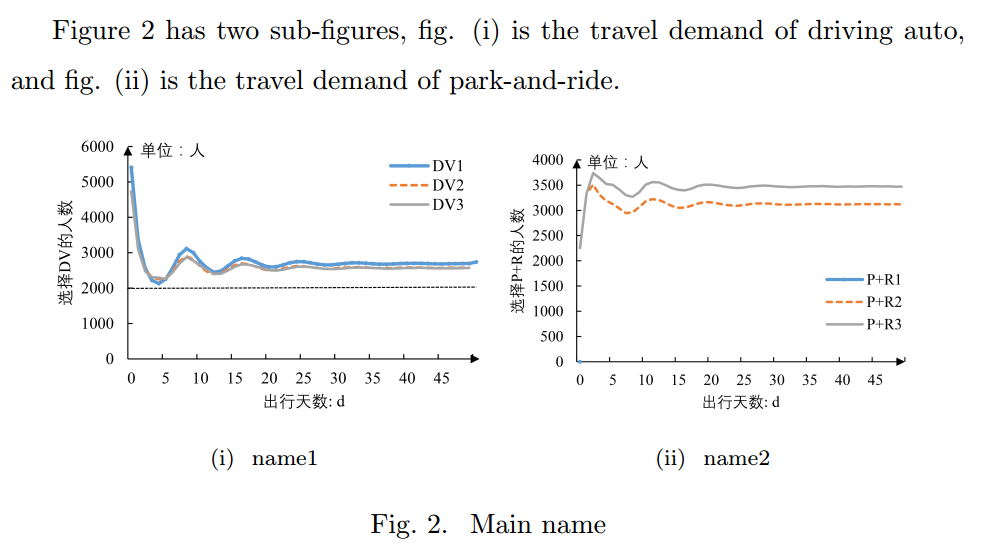
Figure \ref{Fig.main} has two sub-figures, fig. \ref{Fig.main}\ref{Fig.sub.1} is the travel demand of driving auto, and fig. \ref{Fig.main}\ref{Fig.sub.2} is the travel demand of park-and-ride.
%以下code与上一小结的无变化
\begin{figure}[H]
\centering  %图片全局居中
\subfigure[name1]{
\label{Fig.sub.1}
\includegraphics[width=0.45\textwidth]{DV_demand}}
\subfigure[name2]{
\label{Fig.sub.2}
\includegraphics[width=0.45\textwidth]{P+R_demand}}
\caption{Main name}
\label{Fig.main}
\end{figure}

\end{document}
编译后得到:
4.多图并排显示(非子图模式)
%导言区的此三行无变化
\usepackage{graphicx}
\usepackage{float}
%文章如果不涉及子图,以下代码可以删除,本文因需要一起示例排版,就保留了
\usepackage{subfigure}
\usepackage[]{caption2} %新增调用的宏包
\renewcommand{\figurename}{Fig.} %重定义编号前缀词
\renewcommand{\captionlabeldelim}{.~} %重定义分隔符
 %\roman是罗马数字编号,\alph是默认的字母编号,\arabic是阿拉伯数字编号,可按需替换下一行的相应位置
\renewcommand{\thesubfigure}{(\roman{subfigure})}%此外,还可设置图编号显示格式,加括号或者不加括号
\makeatletter \renewcommand{\@thesubfigure}{\thesubfigure \space}%子图编号与名称的间隔设置
\renewcommand{\p@subfigure}{} \makeatother

\begin{document}

\begin{figure}[H]
\centering %图片全局居中
%并排几个图,就要写几个minipage
\begin{minipage}[b]{0.45\textwidth} %所有minipage宽度之和要小于1,否则会自动变成竖排
\centering %图片局部居中
\includegraphics[width=0.8\textwidth]{DV_demand} %此时的图片宽度比例是相对于这个minipage的,不是全局
\caption{name 1}
\label{Fig.1}
\end{minipage}
\begin{minipage}[b]{0.45\textwidth} %所有minipage宽度之和要小于1,否则会自动变成竖排
\centering %图片局部居中
\includegraphics[width=0.8\textwidth]{P+R_demand}%此时的图片宽度比例是相对于这个minipage的,不是全局
\caption{name 2}
\label{Fig.2}
\end{minipage}
\end{figure}

\end{document}
编译之后的效果:
5.其他可参考的链接
其他可用的插入图片的宏包还有:psfig,epsfig,epsf,等等。详细用法参见:LaTex学习笔记(1)–LaTeX文档插入图片的几种常用方法_小鸟kivi_新浪博客。
取消图片编号,只保留图片名称的方法:LaTeX技巧008:并排插入图片以及去掉图片编号 - ProgramChangesWorld的专栏 - CSDN博客。
有关子图编号问题,以及更多的子图样式自定义选项,参见:latex子图编号问题_百度知道。
LaTeX排版札记:表格和列表生成
https://zhuanlan.zhihu.com/p/34271941
表格生成
先贴给大家一个万用灵药——Tables Generator,网址:Create LaTeX tables online。其实打开这个网站并尝试随便生成了几个简单的表格之后,就已经觉得没啥继续写表格排版札记的必要了。真是个扎心的开始~
但多数情况下,大家在表格排版时仍会精益求精。因此,还是继续简要介绍一些常用的表格格式设置方法:表格浮动、对齐方式、合并单元格、三线表、单元格内文字换行、表格脚注。
\documentclass[review]{elsarticle}
%表格排版需要插入的宏包以及部分自定义格式
\usepackage{multirow} %合并多行单元格的宏包
\usepackage{longtable} %不宽但很长的表格可以用longtable宏包来进行分页显示
\usepackage{array} %一般用于数学公式中对数组或矩阵的排版
\usepackage{makecell}% makecell命令对表格单元格中的数据进行一些变换的控制。我们可以使用 \ 命令进行换行,也可以使用p{(宽度)}选项控制列表的宽度
\usepackage{threeparttable} %制作三线表格
\usepackage{booktabs}%s三线表格中的上中下直线线型设置宏包,在这个包中水平线被教程\toprule、midrule、buttomrule。
%表头文字格式的详细设置
\renewcommand\theadset{\renewcommand\arraystretch{0.85}%
\setlength\extrarowheight{0pt}}%行距
\renewcommand\theadfont{\small}%字体
\renewcommand\theadalign{rt}%行列对齐
\renewcommand\theadgape{\Gape[0.5cm][2mm]}%上下垂直距离

\begin{document}
%插入表格的示范
\begin{table}[htbp] %表格的浮动环境
 \centering\small
 \begin{threeparttable}
 \caption{Effect of Trade Openness on Environment}
  \begin{tabular}{lccc} %表格环境,{}中是单元格对齐方式,l左对齐,c居中,r右对齐
  \toprule %表头直线
   \makecell[c]{two lines\\ example}    &   single column & \multicolumn{2}{c}{Multicolumn head} \\
  \midrule %表中直线
  $\ln(y/pop)$ & \makecell[c]{two lines \\ example}  &    287.25* &     566.65 \\
  \midrule %表中直线
  \multirow{2}{*}{$\ln(y/pop)^2$} &    $-$22.85* &    $-$16.58* &   $-$35.57** \\ \cline{2-4}

 &     $-$.29** &      $-$.31* &       $-$.37 \\
    \midrule %表中直线
  $Polity$ &     $-$3.20* &     $-$6.58* &    $-$6.70** \\
    \midrule %表中直线
  $\ln(LandArea/pop)$ &      $-$5.94 &     $-$2.92* &    $-$13.02* \\
    \midrule %表中直线
      Obs. &         36 &         41 &         38 \\
        \midrule %表中直线
    $R^2$ &       0.16 &       0.68 &       0.62 \\
  \bottomrule %表底直线
  \end{tabular}
  \small
  Note: Robust standard errors in parentheses. Intercept
        included but not reported.
 \begin{tablenotes}
  \item[*] significant at 5\% level
  \item[**] significant at 10\% level
 \end{tablenotes}
 \end{threeparttable}
\end{table}

\end{document}
最终的显示效果如下图:
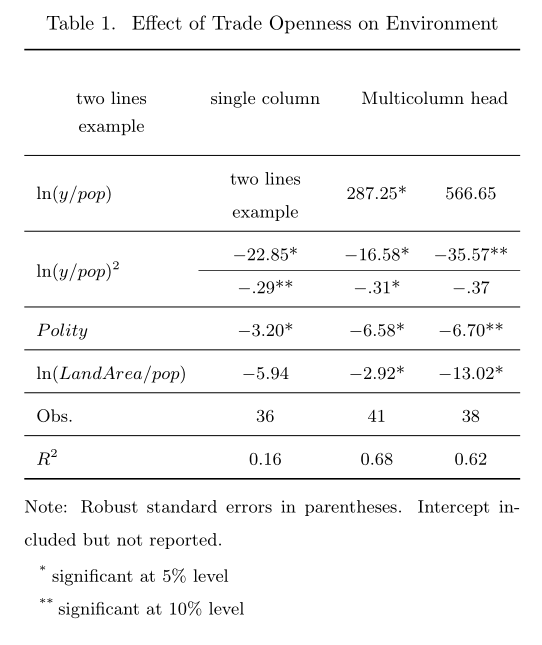
与图表排版中类似,首先我们需要调用一些常用的宏包。在上面的代码块中,我们调用了:multirow、longtable、array、makecell、threeparttable。具体含义和提供的功能参见代码块中的对应注释。下面,将逐条解释代码块中的具体表格生成方法。
(1)表格浮动和对齐方式
在latex表格的生成中,table是让表格浮动的环境,tabular是构造表格的环境。一般的结构是:
\begin{table}[表格在页面上的位置,即浮动方式]
\centering
\caption{.....}\label{...}
\begin{tabular}{对齐方式}
.........
\end{tabular}
\end{table}
[]中的参数一般为:!htbp、H 和 htbp,实现的效果分别为:忽略美学的自动位置、当前插入位置、浮动格式。详见 Latex强制图片位置 - CSDN博客。需要注意的是,如果选择H作为参数,一般还需要在导言区加上 \\usepackage{float}。
对齐方式包括:l,左对齐;c,居中对齐;r,右对齐。一般在 \\begin{tabular} 后面标注。
此外,表格环境还有其他构造方式,具体参见 LaTeX技巧心得242:LaTeX编辑表格的常用宏包与示例_LaTeX_Fun_新浪博客,以及 LaTeX 编辑部 - 常用宏包 - 表格。
(2)合并单元格
两类合并方式:多行合并和多列合并。
- 多行合并的设置格式为:
\\multirow{合并的行数}{行宽}{文本},其中的行宽参数不可忽略,如果想设置为自动,则用\*代替。然后,需要注意的是,\\multirow{行数}{行宽}{文本}要写在这些行的第一行,其他行的文本保持空白,但正常的文本分隔符&仍要保留。 - 多列合并的设置格式为:
\\multicolumn{合并的列数}{对齐方式}{文本}。此时,合并列所在的行中,文本分隔符要相应减少。例如:如果该行合并了2列,则该行的分隔符要相应减少1个。
(3)三线表
三线表绘制需要在 {threeparttable} 的环境中生成,同时还需要调用 booktabs 宏包。最重要的是画出表头直线(\\toprule)、表中直线(\\midrule)和表底直线(\\bottomrule)。我们在示例中实际上绘制了多条表中直线(\\midrule)。需要注意的是,如果我们希望绘制的表中直线并不是整行,则需要在相应行结束之后用 \\cline{行数范围} 命令进行绘制。
(4)单元格内文字换行
单元格内的文字强制换行,需要调用 makecell 宏包,采用 \\makecell\[对齐方式\]{文本1 \\\\ 文本2} 对文本强制换行。其中,\\\\ 是强制换行符号。参见:宏包 makecell 应用(一)系列教程。
(5)表格脚注
表格的脚注添加方式为:
\begin{tablenotes}
  \item[脚注符号1] 说明文本
  \item[脚注符号2] 说明文本
 \end{tablenotes}
其实形式上与列表是很相似的,有多少个说明项,就添加多少个 \\item[]。
(6)其他常见的表格排版功能
- 合并单元格、固定列宽、表格跨页, latex 表格制作 - 只缘身在此山中 - 博客园
- 表格的并排排版, 【LaTeX】表格并排排版_ddswhu_新浪博客
- 表格的分页显示, Latex的分页表格与longtable宏包 - alliedjeep.com
- 三线表格中的横线格式设置,用booktabs宏包改善你的表格 - CSDN博客
列表生成
相对于生成表格而言,生成列表就非常简单了。直接贴代码吧,详细格式设置直接看注释行即可:
%导言区需要新增的宏包
\usepackage{enumerate} %列举宏包

%正文部分的代码
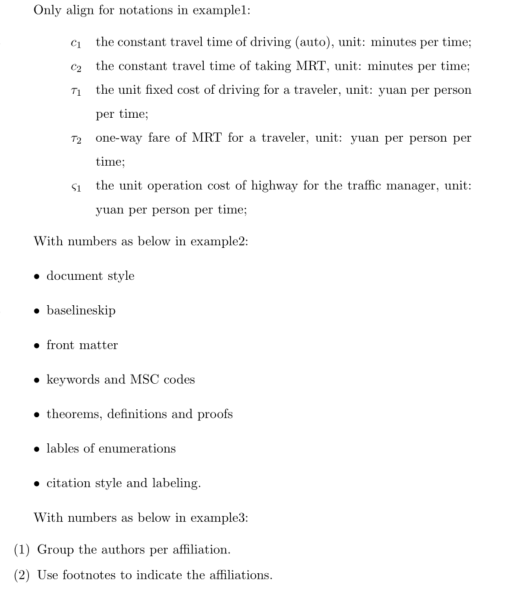
% 无编号,但公式符号可以对齐的做法,example1
\begin{enumerate}[align=right]
\setlength{\leftmargin}{2em} %左边界
\setlength{\parsep}{0ex} %段落间距
\setlength{\topsep}{0ex} %列表到上下文的垂直距离
\setlength{\itemsep}{0ex} %条目间距
\setlength{\labelsep}{1em} %标号和列表项之间的距离,默认0.5em
\setlength{\itemindent}{0em} %标签缩进量
\setlength{\listparindent}{0em} %段落缩进量
  \item [ $c_1$]   the constant travel time of driving (auto), unit: minutes per time;
  \item [$c_2$]  the constant travel time of taking MRT, unit: minutes per time;
  \item [$\tau_1$]  the unit fixed cost of driving for a traveler, unit:  yuan per person per time;
  \item [$\tau_2$]   one-way fare of MRT for a traveler, unit: yuan per person per time;
  \item [$\varsigma_1$]  the unit operation cost of highway for the traffic manager, unit: yuan per person per time;
\end{enumerate}

%有编号的一般做法, example2
With numbers as below in example1:
\begin{itemize}
\item document style
\item baselineskip
\item front matter
\item keywords and MSC codes
\item theorems, definitions and proofs
\item lables of enumerations
\item citation style and labeling.
\end{itemize}

%有编号的一般做法,example 3
With numbers as below in example2:
\begin{enumerate}[(1)]
\item Group the authors per affiliation.
\item Use footnotes to indicate the affiliations.
\end{enumerate}
最终生成的效果如下,基本看起来像纯文本输入的那种。
